Why Float Choice Matters in Junior Angling Coaching
Explore this guide to learn more about Why Float Choice Matters in Junior Angling Coaching.
- /
- Guides /
- Technical Information /
- Why Float Choice Matters in Junior Angling Coaching
Understanding the Float
The foundation of good fishing
One of the biggest challenges children face when starting their fishing journey is understanding why a float behaves the way it does. To many juniors, a float is simply the thing that bobs up and down. But in reality, it’s the most important part of the entire setup — the bridge between the bait beneath the surface and the angler waiting patiently above it. When chosen well, a float helps a junior understand what the fish are doing, how the water is moving, and how naturally the bait is falling. When chosen badly, even the keenest young angler can struggle to catch fish or read bites properly.
At Summerhayes Juniors, we focus heavily on float choice during our weekly fishing coaching sessions because it forms a foundation that juniors will use for the rest of their angling lives. Whether a child is practicing whip fishing on the Bridgwater & Taunton Canal or learning their first pole rigs on a Somerset commercial fishery, the principles of float selection remain consistent. Understanding these principles builds confidence, reduces frustration, and leads to more fish in the net.
This guide has been written as a comprehensive resource for parents and juniors — something that mirrors the teaching style we use during our junior angling coaching at the lakes. It explains float shapes, shotting, stem materials, visibility tips, UK water behaviour, and even simple rules that juniors can remember and use again and again. Our aim is to make float selection clear, logical, and enjoyable.

Understanding the Parts of a Float
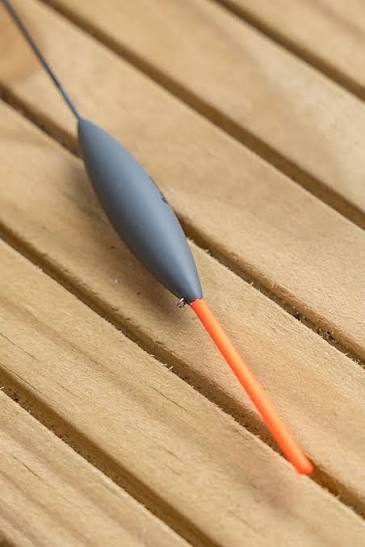
Before a junior can choose the right float, it helps to know what each part does. Although floats come in dozens of shapes and sizes, every float has three key components: the body, the stem and the tip. When children understand how these work together, float selection becomes a much simpler decision.
The float body is where the buoyancy sits. Slimmer bodies are more sensitive and best for calm conditions, while rounder bodies create stability in windier or deeper water. The stem controls how the float behaves under the water. Wire stems settle slowly and sensitively, making them ideal for shy-biting species such as roach or skimmers. Glass stems provide stability and are easy for beginners to control. Carbon stems offer a good middle ground and are durable enough for junior anglers who might not be the most delicate with their tackle.
Then there’s the tip — the part that tells the real story. A thin solid-fibre tip is perfect for delicate fishing and small baits. A thicker hollow tip is more visible and ideal for carp, F1s or windy conditions. During our weekly coaching sessions, many juniors naturally gravitate towards hollow tips because they’re easier to see, but we gradually introduce thinner tips as their confidence and skill grow.

The Most Important Rule We Teach
A significant part of junior angling coaching centres around simplification. If something can be made easy to repeat, juniors learn it faster — and with more confidence. That’s why one of the core principles we teach at Summerhayes Juniors is the “one No.8 shot per foot of depth” rule.
In perfect conditions, this gives juniors a consistent fall rate, keeps rigs balanced, and helps bait sink naturally. For example, if a peg is three feet deep, a junior will use three No.8 shot spaced evenly down the line. If the water is six feet deep, they will use six No.8 shots. It sounds simple, and it is — but the results are transformative. A consistent fall rate instantly improves bite detection and removes the guesswork many young anglers struggle with.
However, conditions aren’t always perfect.
On windy days or when there is undertow, the float and rig can be dragged off-line, causing the bait to rise unnaturally. In these situations, juniors will need to add extra weight — either by increasing the number of No.8s or by introducing a small bulk — to hold the rig stable and maintain proper presentation.
Even when adjustments are needed, the underlying idea remains the same:
Match your shotting to your depth and conditions.
Once juniors have mastered this principle, they can confidently progress to more advanced variations such as bulk-and-dropper rigs or positive carp rigs.

Choosing the Right Float Shape for UK Waters
Float shapes can feel overwhelming when juniors first open a tackle box — slim pencil floats, teardrops, diamonds, round-bodied patterns, and tiny dibbers all look completely different. However, shape selection becomes much easier when explained logically.
Slim pencil or chianti-style floats are brilliant for whip fishing and light rigs. They cut through still water smoothly, react instantly to bites, and help juniors catch fast-moving silverfish such as roach and rudd. These floats are common in natural venues like canals or small ponds, where delicacy is needed.
Round-bodied floats provide the opposite behaviour. They sit sturdily in the water, remaining stable even when wind or tow is present. These are the floats we often use during junior angling coaching sessions on commercial venues such as Summerhayes, Sedges or Avalon. They support bulk shotting, behave predictably and give juniors a positive, confident style of fishing that’s perfect for carp and F1s.
Diamond or teardrop-shaped floats sit nicely in the middle, offering versatility. They work well for mixed species and variable conditions, making them a reliable choice for juniors who are still learning what shape suits which situation. Dibbers, meanwhile, are used for margin fishing or shallow tactics. They’re short, extremely stable and perfect for those exciting moments when children target carp right under their feet.
By understanding why each float shape exists, juniors can make informed decisions rather than guessing.

How Weather, Tow and Water Clarity Influence Float Choice
UK waters behave differently through the seasons and from lake to lake. Even on the same venue, wind direction or clarity can change the entire behaviour of a float. During our weekly coaching sessions, we teach juniors to read the water before they even set up a rig.
On calm summer evenings, a slim or sensitive float makes perfect sense. It will sit beautifully still and respond to the slightest roach bite. However, when the wind blows across a lake such as Longs at Summerhayes, a light float becomes unusable — it drags, wobbles, and rarely settles correctly. In those conditions, a junior needs a round-bodied or heavier float to anchor the rig.
Tow, the movement of water beneath the surface, affects how the line behaves. Even if the surface looks still, tow can pull a float sideways or lift your shotting. Teaching juniors about tow greatly improves their understanding of rig behaviour. In stronger tow, we might introduce a bulk shot with a couple of small droppers, helping the bait to reach the bottom quickly and sit still.
Water clarity is another factor that juniors pick up surprisingly quickly. Clear water usually requires finer tips and lighter rigs because fish behave more cautiously. Coloured or muddy water allows thicker tips and more positive rigs because fish feed more boldly. Helping juniors recognise these patterns is a big part of our structured junior fishing lessons at Summerhayes.

Whip Fishing: The Perfect Starting Point for Beginners
Whip fishing remains one of the simplest and most rewarding methods for juniors. Without a reel to complicate things, children can focus on presentation, bite detection and handling fish safely. Most whip fishing takes place in water between two and five feet deep, which makes the “one No.8 per foot” rule ideal.
A typical beginner’s whip setup might involve a 0.5–1.0g pencil float, light mainline, small hooks and evenly spaced No.8 shots. This creates a gentle, natural fall of the bait that attracts silverfish such as roach, rudd or small skimmers. Juniors quickly build rhythm and confidence because they see results — bites come fast, and the tackle behaves exactly as expected.
We often use whip fishing during weekly fishing coaching sessions, especially with new anglers who need to experience early success to build enthusiasm. Once a junior understands how a float should sit, settle and respond, they are ready to move into pole fishing with longer rigs and heavier floats.

Pole Fishing: Taking Juniors to the Next Level
Pole fishing adds complexity, but it also gives juniors more precision and control. The pole allows them to place rigs accurately, feed consistently and adjust presentations quickly. This is why pole work is a core part of our junior angling coaching programme.
When targeting carp and F1s on commercial fisheries, we may select floats in the 0.3–0.6g range with hollow tips, carbon stems and round bodies. These floats are strong, highly visible and stable. Shotting is often bulked two-thirds down the line with a couple of small droppers, helping the bait reach the bottom quickly before spreading out to attract fish.
For skimmers and roach, especially in deeper lakes or coloured water, we introduce floats with slimmer bodies and finer tips. These require more finesse, but juniors progress quickly when they understand why. Sensitivity helps detect shy winter bites, and even a tiny lift or movement from a cautious skimmer becomes visible with the right float.
Pole fishing also teaches juniors about plumbing depth correctly, controlling line under the pole tip, and reacting to changes in tow or wind. These are the lessons that turn beginners into thoughtful, adaptable young anglers.

Shotting Patterns Explained Simply
Shotting is where float choice comes to life. Even the perfect float performs badly if the shotting is wrong. A float must be balanced so that just the right amount of tip is visible — too much and the float becomes insensitive, too little and the float drowns.
During coaching sessions, we teach three primary shotting patterns. The first is the strung-out pattern, which is perfect for whip fishing and natural venues. It creates a smooth fall of the bait and makes each shot act like a brake, showing bites beautifully as the rig settles.
Then we introduce bulk-and-dropper shotting for pole work. The bulk gets the bait down quickly, which is ideal on commercial lakes where carp feed on the bottom. The droppers create the final, natural descent that often triggers bites from feeding fish.
Finally, we teach lift-method shotting for margin fishing or shallow rigs. Here, the float responds by lifting rather than dipping, providing juniors with a rewarding, easy-to-see bite indication that boosts confidence.

Choosing the Right Float Weight
One of the more surprising lessons juniors learn is that most beginners — and many adults — fish with floats that are too light. Light floats might feel easier, but in reality, they often drag, wobble, and make the rig incredibly hard to read.
In UK conditions, especially on commercial lakes, a slightly heavier float almost always improves presentation. The float settles faster, the bait behaves more naturally, and tow becomes easier to control. When a junior learns that increasing float size brings stability rather than difficulty, they immediately become more willing to experiment.
At Summerhayes Juniors, we use a simple rule of thumb: match float size to depth but never be afraid to step up a size when the conditions require it. This reinforces adaptability — a key element of our weekly fishing coaching sessions.

Matching Float Choice to Bait
Different baits demand different levels of sensitivity. For example, maggots work beautifully with fine tips because fish often mouth them gently. Pellets and corn, on the other hand, are heavier and require a thicker tip to avoid sinking the float. Juniors quickly understand this once they see the comparison in real-time during coaching sessions.
Bread punch, used mainly in canals or winter fishing, needs a delicate approach. Meat and corn in commercial venues require positive rigs and bold floats. Matching float choice to bait becomes second nature once juniors recognise how weight and visibility work together.

Mistakes Juniors Commonly Make — And How We Fix Them
Many juniors start by using floats that are too light or tips that are too thick. Others space their shotting randomly, leaving their bait behaving unnaturally. Some struggle with plumbing depth properly, resulting in rigs that either drag or sit too far off bottom.
During junior angling coaching, we fix these issues step by step. We show juniors how a float should behave when correctly shotted, why the “one No.8 per foot” rule works so well, and how tightening or loosening the shotting pattern affects bite indication. With practice, juniors begin to predict how a float will behave before it even hits the water. That’s when everything clicks into place.

Example Float Setups for Real Somerset Venues
To help parents and juniors apply these ideas, here are examples we commonly use during sessions.
On commercial a venue like Summerhayes, a 0.5g Chianti-bodied float with a hollow tip works perfectly for carp and Silvers. On the Bridgwater & Taunton Canal, whip rigs with slim pencil floats and evenly spaced No.8 shots catch roach all day long. Natural lakes often demand teardrop floats with strung shotting for skimmers and roach.
These examples help juniors understand not just what to use, but why each setup works.
Bringing It All Together
Building Confident Young Anglers
Float choice may seem complicated at first, but once juniors learn the logic behind shapes, weights and shotting, everything becomes intuitive. At Summerhayes Juniors, we believe float selection is one of the most important skills a young angler can learn because it encourages problem-solving, observation and independence — qualities that matter far beyond fishing itself.
By teaching simple, repeatable rules and reinforcing them during weekly fishing coaching, we help juniors progress at a natural pace while enjoying every moment on the bank. A child who understands how to select the right float is no longer guessing; they are thinking like an angler.
FAQs
The Float: A Small Tool That Teaches Big Lessons
Helping young anglers understand how a float works is one of the first steps toward confident pole and whip fishing, and a core part of our weekly coaching at Summerhayes Juniors.-
Most juniors learn best using a light pencil or chianti-style float on a whip. These floats are easy to control, sensitive enough to show clear bites, and ideal for the short, simple rigs used during beginner coaching sessions.
-
It’s a simple training method we teach at Summerhayes Juniors. If the water is four feet deep, the junior uses four No.8 shot spaced evenly down the line. This gives a natural fall of the bait and helps young anglers understand how depth affects rig behaviour.
-
If the float wobbles, drifts sideways, refuses to settle, or makes bites hard to read, it’s usually too light. UK commercial lakes often require a slightly heavier float than parents expect — especially on windy days.
-
A round-bodied float with a hollow tip works best for carp and F1s. These floats are stable, visible and strong enough for bigger fish. We normally use 0.3g–0.6g floats depending on depth and conditions.
-
Yes — but not many. A slim float for silverfish, a rounder float for carp, and a dibber for margin fishing will cover most of a junior’s early fishing. During weekly coaching we show juniors when each one is needed so they don’t feel overwhelmed.
-
Whip floats tend to be lighter and slimmer because the fishing is short-range and delicate. Pole floats can be heavier and more robust because they’re used in deeper water and for a wider range of species, including carp.
-
A good rule for juniors is: just enough to see. Too much tip makes the rig insensitive, while too little makes the float unstable. Thin tips are for delicate baits like maggots; thicker hollow tips suit pellets, corn and carp fishing.
-
Strung-out No.8 shots are perfect for juniors learning whip fishing. This pattern gives a smooth, manageable fall of the bait and makes bite readings simple. As they progress, we introduce bulk-and-dropper patterns for carp.
-
Plumbing is essential. If the depth is wrong, no float — no matter how good — will perform properly. We teach juniors to plumb every swim so they know exactly how their bait sits on the bottom.
-
Only for visibility. Bright hollow tips help in low light or wind; darker fibre tips are great when fish are shy or the water is clear. Juniors soon learn what they can see best.


